Add pure CSS horizontal drop down menu to blogger:
Go to the web site
http://pixopoint.com
http://pixopoint.com
A main feature that's missing in blogger is a drop down menu and although it enables you to use tabs,
your still very limited in designing it. A good rule of thumb is to always have a copy of your tempelate
before making any changes to it. You can download your tempelate by going to {Design > Edit HTML}.
I will show you the easiest step by step instruction for people who have no clue about css or are just
beginners. There is a site called pixopoint, and thanks to this website, it lets you to create a drop down
in very easy steps and with your own desire!
Once there, you will be able to customize your drop down menu however you like and its
very straight forward. You can use the color code to see which code to use for what color
(Don't paste the # sign, just the number). After you've done everything you want to go ahead
and choose SUBMIT DESIGN, and you will be given a preview of how your drop down menu
will look like.
very straight forward. You can use the color code to see which code to use for what color
(Don't paste the # sign, just the number). After you've done everything you want to go ahead
and choose SUBMIT DESIGN, and you will be given a preview of how your drop down menu
will look like.
After submitting your design, you will be given a list of css code at the bottom of the page.
This will be the design of your drop down menu. Copy the css code, go to {Design > Edit HTML}
and paste the code just before the tag. (Use Ctrl + F and put the code in it so that you will find it faster)
]]></b:skin>

for our drop down menu, a neat trick to do is to erase all the css of our tab navigation
bar that is put in by the new blogger tempelate. This way when you add your HTML between
your header and post, your drop down menu wouldn't be broken and also it will be placed right
under the header. In order to do this once again we are going to go (Design > Edit HTML) and
search for the tag /* Tabs and then delete everything included inside the tag. Be sure not to delete
anything else so that you won't break your blog.

Now that that's done, we can begin inserting our HTML so we can actually make the drop down menu work.
Go to (Design > Page Elements) and then "Add a Gadget". This is where you enter your basic HTML shown below.
__________________________________________________________________________________
<!--[if lte IE 7]>
<script type="text/javascript" src="http://pixopoint.com/wp-content/plugins/pixopoint-menu/scripts/suckerfish_ie.js"></script>
<![endif]-->
<ul id="suckerfishnav" class="sf-menu">
<li><a href="#">Link 1</a></li>
<li><a href="#">Link 2</a>
<ul>
<li><a href="#">Sub link</a></li>
<li><a href="#">Sub link</a></li>
<li><a href="#">Sub link</a></li>
</ul>
</li>
<li><a href="#">Link 3</a>
<ul>
<li><a href="#">Sub link</a></li>
<li><a href="#">Sub link</a></li>
<li><a href="#">Sub link</a></li>
<li><a href="#">Sub link</a></li>
<li><a href="#">Sub link</a></li>
</ul>
</li>
<li><a href="#">Link 4</a>
<ul>
<li><a href="#">Sub link</a></li>
<li><a href="#">Sub link</a></li>
<li><a href="#">Sub link</a></li>
<li><a href="#">Sub link</a></li>
</ul>
</li>
</ul>
_________________________________________________________________________________
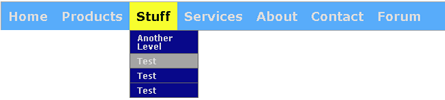
Once you have added the HTML,you can start editing it to your own desire.
the "Link" is the head navigation
menu, the "Sub link" will be your drop
down menu, and "#" will be the link that you will direct the menu to.
However you will notice something wrong with the drop down menu.
You will see that your drop down menus
either go behind your posts or that you can't hover down with your mouse,
and there's a really simple fix to this problem.
Go to (Design > HTML) and find the tag that's below #suckerfishnav ul.
(Use Ctrl + F and put the code in it so that you will find it faster)
position:absolute;
Right after the semicolon of absolute add the following tag
z-index:100;

but not for internet explorer 7-up! The script before the HTML of our drop down menu
actually fixes some more glitches of the drop down menu for IE, but unfortunately
some people, the drop down menu will hover behind their source, and the best fix for
this is to add the following tag(s) at the end of the HTML
<br>
and you want to make sure to add a as many as them until the space between your drop
down menu and post is as long as your drop down menu, so that it will not hide behind the post.
Another fix you would want to apply in order to get rid of the sticky menus when you hover in IE
is to go to (Design > Tempelate Designer > advanced > add css ) and here you will add the following code,
#suckerfishnav li:hover, #suckerfishnav li.hover {
position:static;
}


0 comments:
Post a Comment